You can always disable the lock screen for quick access to the sign-in screen, and here are two ways to complete the task.
- Key Points
- To disable the Windows 10 Lock Screen, open Group Policy > Computer Configuration > Administrative Templates > Control Panel > Personalization, open “Do not display the Lock Screen,” choose “Enabled,” apply the settings and restart the computer.
- Alternatively, open the Registry, browse the “HKEY_LOCAL_MACHINE\SOFTWARE\Policies\Microsoft\Windows” path, create the “Personalization” key and the “Nolockscreen” DWORD and set the value to “1.”
UPDATED 10/23/2023: On Windows 10, you can disable the Lock Screen to eliminate the extra step before signing in, and in this tutorial, I’ll show you the steps to complete this task. The Lock Screen is the first visual experience when the device starts and offers valuable information (such as date and time, weather, and app notifications) before you sign in. However, it adds an extra step to access your account.
If you want to skip the Lock Screen experience, Windows 10 does not include an option in the Settings app or Control Panel. However, you can turn off the feature using the Group Policy Editor or Registry.
In this guide, I will teach you two ways to remove the Lock Screen on Windows 10.
- Disable Windows 10 Lock Screen from Group Policy
- Disable Windows 10 Lock Screen from Registry
Disable Windows 10 Lock Screen from Group Policy
If you’re running Windows 10 Pro, Enterprise, or Education, you can use the Local Group Policy Editor to turn off the first screen before signing in to your account.
To disable the Lock Screen through Group Policy on Windows 10 Pro, use these steps:
Open Start on Windows 10.
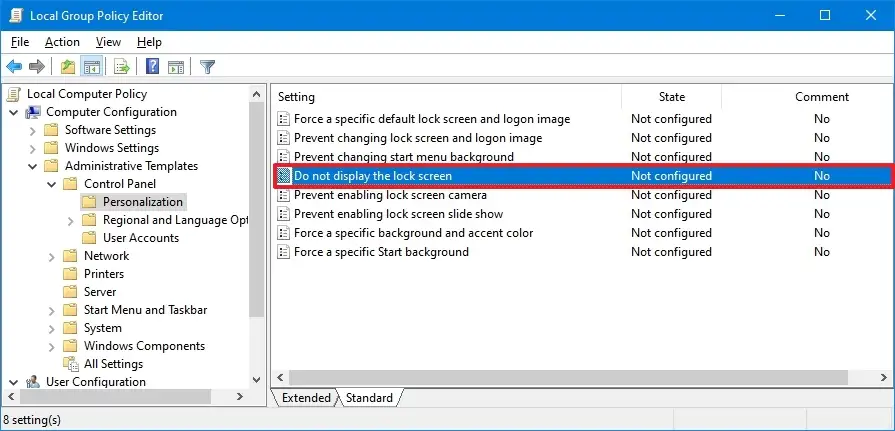
Search for gpedit, and select the top result to open the Local Group Policy Editor.
Browse the following path:
Computer Configuration > Administrative Templates > Control Panel > PersonalizationDouble-click the “Do not display the Lock Screen” policy.

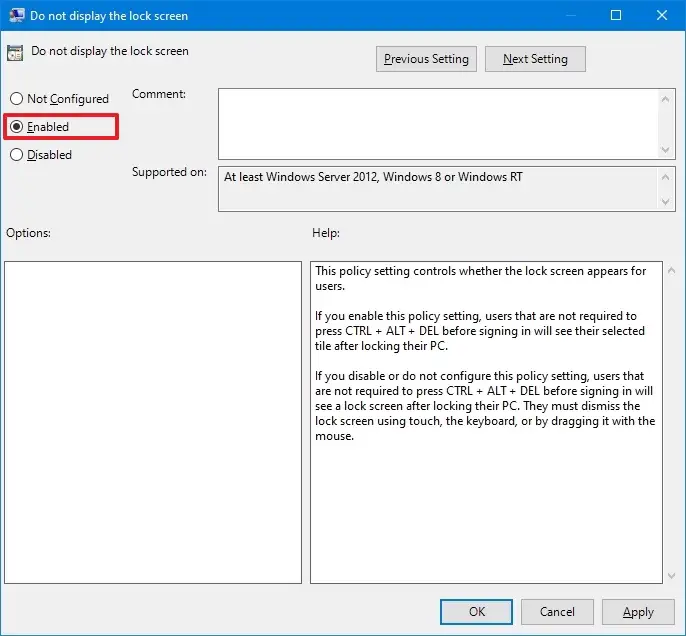
Select the Enabled option to disable the Lock Screen.

Click the Apply button.
Click the OK button.
Restart the computer.
Once you complete the steps, the next time Windows 10 starts, you will be directly directed to the sign-in screen.
Disable Windows 10 Lock Screen from Registry
Windows 10 Home doesn’t include the Local Group Policy Editor, but it is still possible to disable the feature by modifying the Registry. This method works in the Home edition as well as on Windows 10 Pro, Enterprise, and Education.
To disable the Lock Screen through the Registry, use these steps:
Open Start.
Search for regedit, and select the top result to open the Registry.
Browse the following path:
HKEY_LOCAL_MACHINE\SOFTWARE\Policies\Microsoft\WindowsRight-click the Windows key (folder), select the New submenu, and choose the Key option.
Name the key Personalization and press Enter.
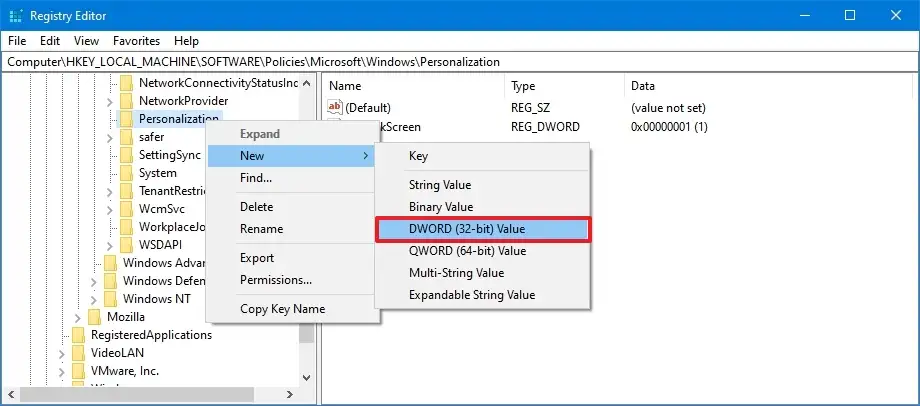
Right-click the Personalization folder, select the New submenu, and choose the DWORD option.

Name the key Nolockscreen and press Enter.
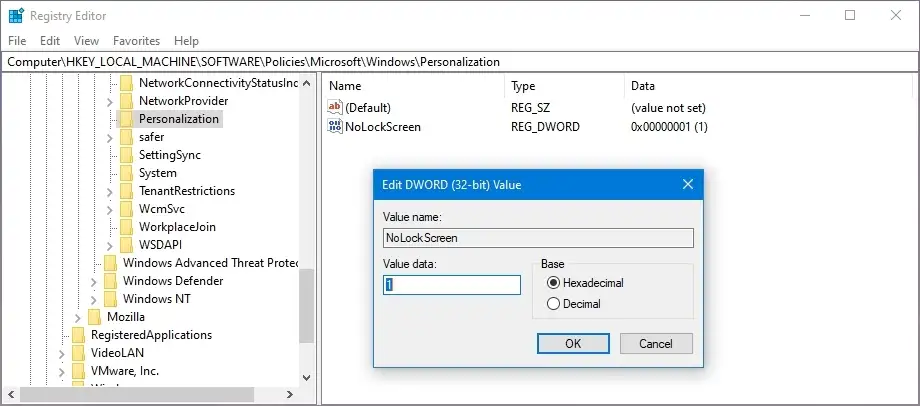
Double-click the Nolockscreen key and set its value data from 0 to 1 to disable the Lock Screen.

Click the OK button.
Reboot the computer.
After you restart your computer, Windows 10 will bypass the Lock Screen and go straight to the sign-in screen.
If you prefer accessing your account without typing a password and skipping the signing-in screen, you can use these instructions to remove the login password in three different ways.
Update October 23, 2023: This tutorial has been updated to ensure accuracy and reflect new changes.


0 Comments